- Features
- Overview
- Download
- Beta
- WinTV Extend
- Installation Guide
- User Guides
- Connections
- Errors
- Utilities
- FAQ
WinTV v7 is here!

WinTV v7 features:
- A new, clear and intuitive interface
- Digital parental control (North America)
- Closed captions (North America)
- Single configuration and scanning pop up menu
- High Definition TV and video support (selected models)
- Integrated TV recording scheduler
- Instant time shift and recording
- Multiple tuner support
- Built-in video player, which supports a wide variety of video formats
- Logical channel numbers
- Signal strength monitor for digital TV channels
New! WinTV v7.2 with WinTV Extend
WinTV Extend is a built-in Internet video server for the WinTV v7.2 application. WinTV Extend is standard in the WinTV v7.2 application. WinTV Extend will take your live TV signal and send it to your iPhone, iPad, iPod touch, Mac or PC computer over either a home WiFi connection or over the Internet.
WinTV v7.2 is available from the Hauppauge webstore at a cost of $9.95 (plus shipping). You can order it from here.
All you need on your iPhone/iPad/iPod touch is a Safari browser pointed to your PC at home. If you are using a Mac or a PC, all you need is a browser (Safari recommended on the Mac) and a Flash video player.
WinTV v7 currently supports the following products:
- WinTV-PVR-150
- WinTV-PVR-250
- WinTV-PVR-350
- WinTV-PVR-500
- WinTV-PVR-USB
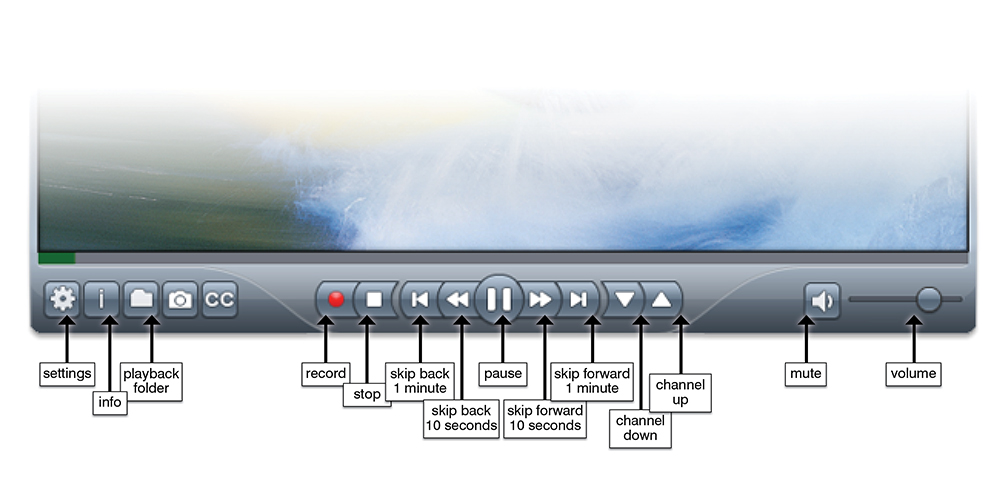
WinTV v7 controls
TV mode buttons
Playback mode buttons
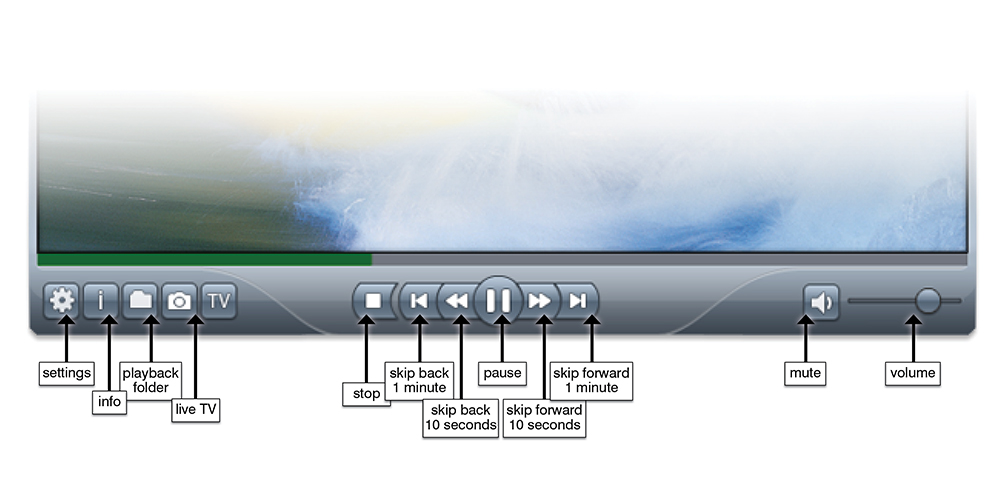
Basic controls of WinTV v7:
- To remove the TV toolbar, double click your LEFT mouse button in the live TV Window. This is called 'No Title' mode.
- To watch TV full screen, double your LEFT mouse button again.
- To exit full screen, double your LEFT mouse button again or hit the ESC key. You will then be in the Normal TV viewing mode.
- You can also change the viewing modes from a drop down menu by a RIGHT click in the live TV window to bring up the Options menu. Click Viewing mode and select Normal, No tile or Full screen.
- Changing TV channels: Click Channel Up or Channel down. You can also RIGHT click in the live TV window to bring up the Options menu and go to Channels. You will see the current TV channel list. You can also change channels by using the numbers on the keyboard or by pressing the letter on the keyboard for the channel name that you want to view.
- To record TV: click the red Record button to start recording. When you are finished recording, click the stop button then click the TV button to return to live TV.
- You can automatically schedule a recording by using the built in TV scheduler. RIGHT click in the live TV window to bring up the Options menu, and then click on Scheduler.
- Playback a TV recording: Click the folder button to open your video folder to select the file for playback.
- Audio settings (SAP audio): RIGHT click in the live TV window to bring up the Options menu and go to Audio stream. You can audio program (if available) of the current TV program that you are watching.
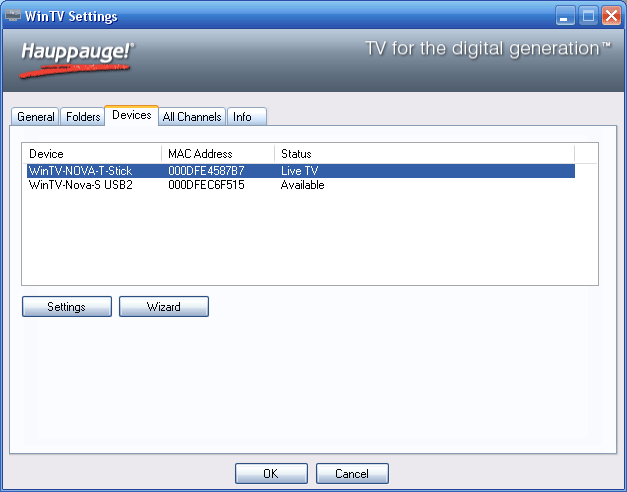
- WinTV settings: RIGHT click the mouse button in the TV window to bring up the Options menu. Click Configuration and the WinTV settings will be displayed.
- To change the size of the TV window , move the mouse pointer to any corner of the TV window. This changes the mouse pointer into a double arrow. Press and hold the LEFT mouse button and drag the window into the desired size, releasing the left mouse button when finished. You can set the size and position of the TV window separately in the normal WinTV viewing mode and the No Title mode.
WinTV v7 features overview
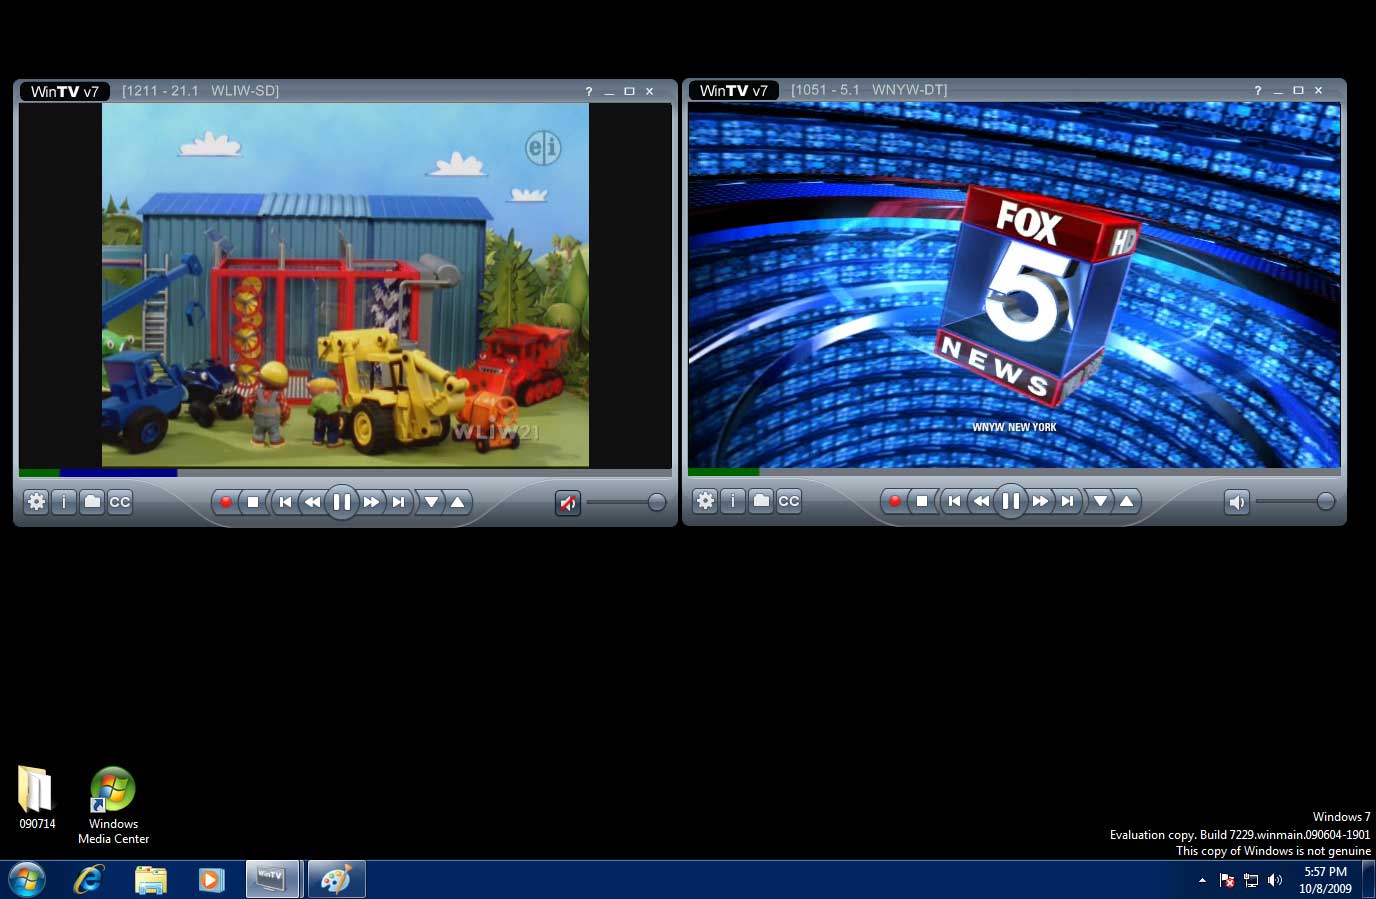
Works with multiple WinTV devices:
WinTV v7 lets you control more than one WinTV device in your system. With the new "multi" feature, if you have dual tuners in your PC, you can have live TV from both on the screen at the same time.
Subtitles:
WinTV v7 lets you display subtitles from your digital TV program on top of the TV window.

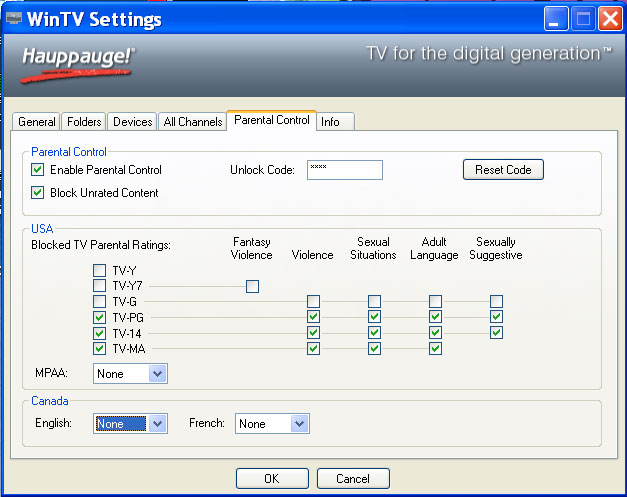
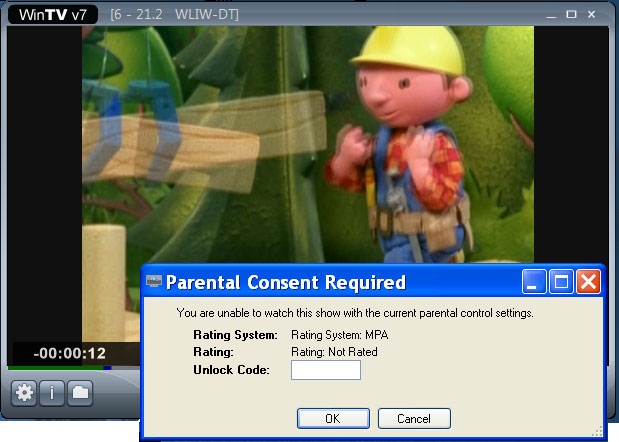
Digital Parental Control
WinTV v7allows you to enable Parental Control on digital TV programs. To enable Parental Control, click the Parental Control tab in the settings menu. Once you set a password in 'Unlock Code' and click on 'Enable Parental Control', you can set the ratings allowed for watching and recording TV.
Note: you cannot watch or record a TV program unless you have the correct Parental Control level.
Monitor the signal you are receiving to allow you to improve aerial placement or correct signal problems on the fly!
Support for multiple file formats.
You can playback many different video files through WinTV v7 in addition to the MPEG-2 TV recordings. This allows WinTV v7 to be a general purpose video media player.
Keyboard short cuts for WinTV v7
| Ctrl A | Aspect ratio |
| Ctrl D | Display the video and audio format of the TV program |
| Ctrl F | Freeze the video |
| Ctrl Z | Open TV Scheduler |
| Ctrl O | View program details (digital TV program, where provided in the broadcast) |
| Ctrl S | Display subtitles |
| Ctrl W | Full screen toggle |
| Alt F | Open File menu for playback |
| Alt M | Open the Task Menu |
| Alt P | Previous channel |
| Ctrl Q | Pause |
| Ctrl P | Play |
| Alt R | Record |
| Alt S | Stop |
| Alt T | Start TV |
| Ctrl C | Catch up |
| Ctrl | Skip ahead |
| Ctrl | Skip back |
WinTV latest version download
WinTV v7 application and TV tuner driver download package
Note: A valid WinTV application CD-ROM (WinTV v6 or WinTV v7) will be needed to install this WinTV v7 version
Any WinTV 7 application CD can be used during the install. If you do not have your original WinTV CD-ROM but would like to update to WinTV v7 or WinTV v8, you can purchase a new CD on the Hauppauge webstore for $9.95
To install the WinTV v7 application update
- Download the WinTV v7 installation package to your PC. After downloading this file, the file is normally saved in the Download directory on your PC
- Insert your original valid WinTV CD in your CD-ROM drive
- Run wintv7_cd from the Download directory on your PC
Download:
WinTV v7 installation package, version 3.9g
For Windows 10, 8, 7, Vista and XP
File name: wintv7_cd_3.9g.exe
File size: 151.4 MB
Date: 02/12/2015
This download is a complete installation package, including drivers for supported WinTV products plus the WinTV v7 application and utilities.
Installation notes:
A valid WinTV application CD-ROM will be needed to install this WinTV v7 version. Any WinTV v6 or WinTV 7 application CD can be used during the install. If you do not have your original WinTV CD-ROM but would like to update to WinTV v7, you can purchase a new CD on the Hauppauge webstore for $9.95
If you have a WinTV v7.2 CD-ROM with Extend, then the latest version of WinTV Extend will also be installed.
To install WinTV v7 on a PC or laptop without a CD-ROM drive
If your PC or laptop does not have a CD-ROM drive, do the following:
- at the conclusion of the installation a dialog box will pop up saying "Activation required"
- Click Enter Product Code
- You will find the Product code on your WinTV v7 Installation CD
- Enter the Product code including dashes and dots
Release notes for WinTV v7 version 3.9G:
- Update to the WinTV-HVR-955Q driver to fix problems seen when switching channels quickly
- Fixed an error "You do not have access to make the required system configuration modifications..."
- Increased Pause Buffer bar size
- Fixed TitanTV tvpi file association bug
- New WinTV-NOVA-HD-USB 2 driver to fix issues in Turkey and other countries with low symbol rates
- New WinTV-HVR-1975 driver to fix issues with 6875 Symbol rate
- Fixed no Extend tab showing on upgrade installation
Beta versions
None at This time.
WinTV Extend - live TV on your iPhone, iPad, Android phone or tablet plus Mac or PC
WinTV v7.2 with Extend Download
WinTV v7.2 with Extend is only available from the Hauppauge webstore at a cost of $9.95 (plus shipping). You can order it from: https://hauppauge.com/site/webstore2/webstore_cd-wintvv7.asp7
If you have purchased WinTV v7.2 with Extend and would like to have the latest version, simply download and install the WinTV v7 application and driver download package below. Put your WinTV v7.2 CD-ROM in your CD-ROM drive during the installation and the latest version of Extend will automatically be installed.
Click here for the WinTV Extend Support page
WinTV Extend latest version
WinTV Extend is part of the latest version of WinTV v7.2 If you have purchased a WinTV v7.2 CD, Extend will be automatically installed. If you would like to buy WinTV Extend, please go to our webstore:
https://hauppauge.com/pages/webstore2/webstore_wintvv8cd.html
WinTV Extend app for iOS (iPad and iPhone)
Installation guide
- Step 1: Download the WinTV v7 installation package
- Step 2: Unpack the installer on your PC
- Step 3: Install the latest Windows driver for your Hauppauge WinTV product
(make sure the WinTV is plugged into your PC or notebook)
(requires a reboot of your PC during this step) - Step 4: Install WinTV v7 and its utilities
- Step 5: Run WinTV v7
Installation overview
Installation overview |
|
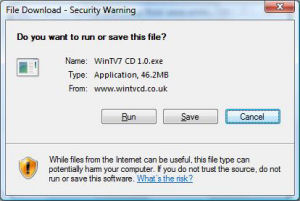
Step 1 - Download the WinTV v7 installer including utilities |
|
Please click on the download link from your products support page, you will be given an option to run or save the file, click run to start the installation procedure: |
 |
Step 2 - Unpack the WinTV v7 installer on your PC |
|
Once the file has finished downloading, the self extracting wizard will begin: |
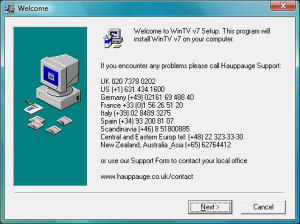 |
Click next then select a path where you wish to extract the files (we recommend leaving this at its default setting), the Hauppauge software and drivers will be extracted automatically to your computer. |
 |
If you have a previous version of the software installed you will be prompted to uninstall it, click OK to automatically do this. |
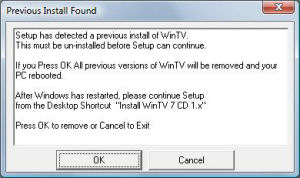 |
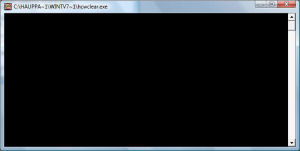
The 'HCWClear.exe' application will start up and begin uninstalling the previous software, any error messages or notes will be shown in the black box. |
 |
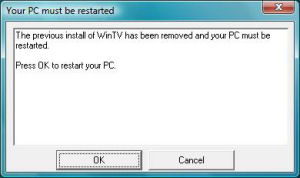
Once complete you may need to restart your computer, press 'OK' to automatically restart your computer. |
 |
Step 3 - Installation of the drivers |
|
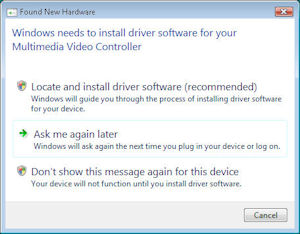
After Windows reboots, you will see the Windows Found New Hardware Wizard. Cancel this Wizard by selecting 'Ask me again later' in Vista or select Cancel in WindowsXP. |
 |
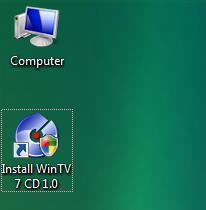
Once you are at your Windows desktop, double click on the Install WinTV 7 link to the install application: |
 |
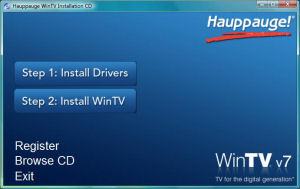
This will open up the Hauppauge install application, click |
 |
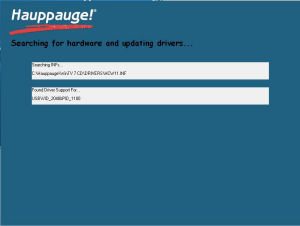
This will then open up our driver installation program and automatically start installing the drivers for your product: |
 |
Once complete, click on the bar to continue. |
 |
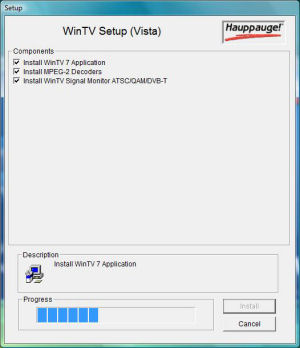
Step 4 - Installation of the WinTV v7 application and utilities |
|
In the Hauppauge installer you will now need to click |
 |
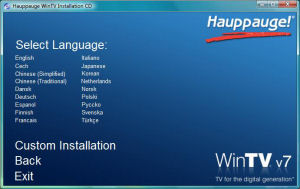
Select the language you wish to install from the list. Note: If you wish to customize the install list click on 'Custom Installation'. |
 |
The applications relevant to your product will now be shown and will begin to install: Note: Installing may take some time as it is updating other system components, please be patient. Once complete click 'OK' then click 'EXIT'. |
 |
Step 5 - Run WinTV v7 |
|
Click on the WinTV v7 icon on your Windows desktop to start the application. The first time you run WinTV v7, you will see the Device Setup Wizard to scan for TV channels. Follow the steps. |
|
WinTV v7 user guides
IR Blaster Configuration Guide
For the WinTV-HVR-1850 and WinTV-HVR-2250 built-in IR receiver/blaster
Used to configure the WinTV-HVR-2250 and WinTV-HVR-1850’s built-in remote control IR blaster for use with either WinTV v7 or Windows Media Center. These instructions also show how the Hauppauge IR blaster can "learn" your set top box remote control.
Setup of WinTV Extend - for live TV on your iPhone or iPad
Setup of the TitanTV program guide (for the U.S. only)
Making connections to your WinTV
There are four ways to make a TV connection to a WinTV
- Antenna: you can plug in an antenna to receive ATSC over-the-air HD TV
- Cable or satellite box: using the the 'RF out' connector on your cable/satellite box
- Cable or satellite box: using the yellow/red/white 'Video out' connectors on your cable/satellite box
- Cable TV wire: directly from your cable TV wire
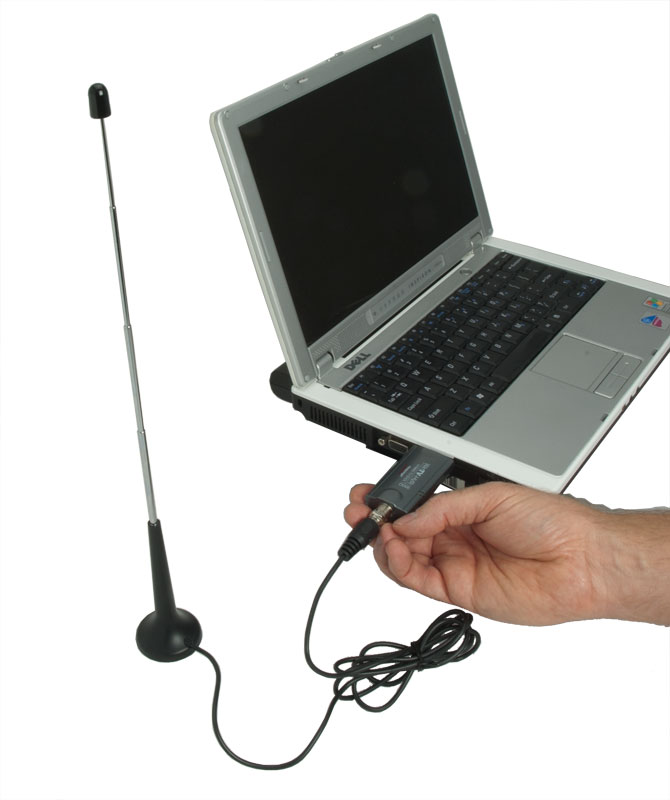 Antenna Antenna |
Cable or satellite TV set top box |
Cable or satellite TV set top box |
Cable TV wire from the wall |
|
|---|---|---|---|---|
| Which type of TV can this connection be used with? | Over-the-air TV | Cable or satellite TV box | Cable or satellite TV box | Cable TV |
| What types of video do I select when scanning for channels in the WinTV application (Device Setup Wizard)? | Digital ATSC | Analog TV | External inputs (S-Video or Composite video) | Digital QAM plus Analog TV (if available in your WinTV tuner) |
| What remote control do I use to change channels? | WinTV remote control | Remote control from your set top box | Remote control from your set top box | WinTV remote control |
| Notes | You can use a roof top antenna for best reception. | Most set top boxes allow you to switch to Channel 3 or 4. When you scan with WinTV, it will pick up the TV signal on the correct channel. Some satellite receivers use channels 60, 70 or 73. But when you scan for Analog TV channels, WinTV will pick up whatever channel is being used by your set top box. | Most set top boxes have A/V connections on the back, which can go into the WinTV's A/V input. | Some cable TV networks transmit analog TV channels, so we recommend scanning for both Clear QAM and analog TV. Not all cable TV networks transmit clear QAM. Check with your local cable TV operator for the availability of clear QAM in your area. |
WinTV v7 error messages and what they mean
First time installation of WinTV v7 or during a reinstallation: “WinTV board not found” or “No TV tuner available”
Step 1: Check the status of your Hauppauge TV tuner drivers in Windows Device Manager
- Click Windows Start, click on Control Panel and click on Device Manager
- In Device Manager, click on Sound, video game Controllers
- You should see your Hauppauge product
Step 2: If the Hauppauge device has a yellow exclamation mark
Click on the Hauppauge device to open it. If you see the following:
"Windows cannot verify the digital signature for the drivers required for this device. A recent hardware or software change might have installed a file that is signed incorrectly or damaged, or that might be malicious software from an unknown source. (Code 52)"
This appears to be a bug in Windows 64 bit OS since the Hauppauge Windows drivers are signed.
The following is the easiest fix to Error Code 52 on Windows 7 or Windows 8 64bit.
- In Device Manager, right click the Hauppauge product under Sound Video and Game Controllers with the exclamation mark and select Uninstall. If you have a USB product you might see multiple listings, please right click the first one on the list. (For this example we will use the WinTV-HVR-950Q. )
- On the Confirm window please check the box for “Delete the driver software for this device” and click OK
- Repeat the uninstall for the other two WinTV-HVR-950Q entries (Note: you won’t be asked to ‘confirm device uninstall’ again)
- Once the drivers are removed, right click on Sound, Video, Game controllers and click Scan for Hardware Changes
- Windows should now look online automatically for the 950Q drivers
- Take a look after a few minutes if the drivers are installed automatically properly under Sound Video and Game Controllers.
- If they still come back as “unsigned” try the procedure again
Errors when running WinTV 7: “TVserver cannot Start” or “.NET framework" errors
This can be caused by a corrupt WinTV v7 Channel Database. You will need to uninstall and reinstall the WinTV v7 application and the Channel database to fix this.
To uninstall WinTV v7, click Windows Start, click on All Programs, click on Hauppauge WinTV run Uninstall Wintv7. You can also or remove Wintv7 using control panel "add/remove programs".
Then you need to remove the backup Channel database:
- Windows Vista, 7 and 8: Go to C:\program data ( this folder is a hidden folder so if you do not see it you need to “show hidden folders “ in your search Options) once you can get to this folder you will see a folder label “Hauppauge”. Delete this folder.
- Windows XP: Go to C:\documents and settings\all users\shared documents\application data ( this folder is a hidden folder so if you do not see it you need to “show hidden folders “ in your search Options) once you can get to this folder you will see a folder label “Hauppauge” delete this folder. Then download the latest version of Wintv7 located in the support section of the website and reinstall (note: you must have your original CD to validate the download.)
Settings.xml file is corrupt or missing
Solution: Uninstall WinTV v7 and then reinstall WinTV 7
- Click Windows Start -> Control Panel and then click Programs and Features
- Find Hauppauge WinTV 7 and double click on this. This will start the uninstall process
- When you are finished uninstalling WinTV v7, reinstall it from your WinTV v7 CD
WinTV v7 Utilities
Prodinfo: get information on your Hauppauge TV tuner
Prodinfo.exe is a program you can run which will extract information about the WinTV product you have installed such as model and serial number, MAC address, revision, and features which can be used to identify the exact model of your product. The driver for the device must be installed in order to run Prodinfo.exe
HCWClear
HCWCLEAR.exe is a program you run to remove all driver and files that were installed with the installation of the WinTV program.
WinTV v7 Frequenty Asked Questions
Where can I find the manual for WinTV?
In WinTV v7, click on the [?] button in the upper right hand corner of the WinTV v7 application (near the "x" which closes WinTV).
In WinTV v8, you can find the manual on our website under the Manuals tab.
What do I need to upgrade the WinTV application from the Hauppauge website?
In order to upgrade your present version of WinTV to the newest version, you need to have a WinTV v6 or WinTV v7 installation CD to validate the upgrade. Note: to upgrade to WinTV v8, you must have either you activation code or either a WinTV v7 or WinTV v8 CD.
After you download the WinTV update from our website, insert your WinTV CD in your CD-ROM drive (if the CD autoruns, cancel the install) then click on the WinTV v7 or v8 download to start the installation. During the installation, you will see a message Activation required. If you have a WinTV v7 CD, click Check WinTV v7 CD. If you have a WinTV v7 or WinTV v8 activation code, click Enter Serial Number. The installation will now proceed to completion.
How do I rescan channels?
How can I save my WinTV Channels database?
To save your channel database go to:
C:\Users\Public\WinTV\Channel Database (Windows 7 and Vista)
C:\Documents and Settings\All Users\Shared Documents\WinTV\Channel Database (Windows XP)
Copy the hcwChanDB_5 file to a place for safe keeping. To replace saved Channels just copy HcwChanDB_5 back to Channel Database Dir.
I scanned for channels, and some were found, yet I do not see any channels listed in WinTV's channel list. What did I do wrong?
If you see channels during the scan, but no channels are listed in WinTV channel list (to see the channel list, right click your mouse on the live TV window, then select Find Channel), then something went wrong in the WinTV TV channel database.
Solution:
- Uninstall WinTV completely: go to start/control panel/ and look for Program and feature and uninstall Hauppauge WinTV.
- After that please restart the computer.
- When the system comes back up please browse to the following folders and if you see a WinTV folder, delete the folder.
- C:\Users\Public\
- C:\Program Files or Program Files (x86)\
- Also please go to this folder which is a hidden folder and delete the Hauppauge folder: C:\ProgramData\
Information on how to show hidden folders in Windows: Show Hidden Files and Folders in Windows 7, 8.x, 10, or Vista https://www.howtogeek.com/howto/windows-vista/show-hidden-files-and-folders-in-windows-vista/
- Once you do this you can reinstall Hauppauge WinTV with latest version from website.
- Now if you scan for channels, you should see them in the WinTV application.
How can I reorder or change the channel numbers in WinTV?
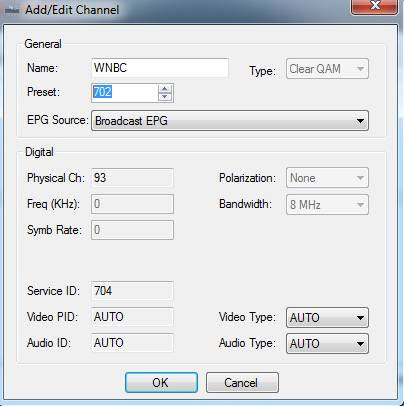
Open the Settings menu in WinTV v8 or WinTV v7 by clicking on the “gear” button in the lower left hand corner of the WinTV application. Then click on the “All Channels" tab and right click on the channel you wish to edit. Click Details. Change the Preset number to the number you want. You can also change the channel Name.
Example:
You will need to follow this procedure if you are scheduling recordings with Titan TV online program guide. For example, if you scan for TV channels in WinTV v7 and find that channel 2704 is WNBC but in the TitanTV electronic program guide WNBC is on channel 702, then do the following:
- click your right mouse button on 2704 in the All Channel list
- change the Preset to 702
- change the Name of the the channel to WNBC
Then, when you select WNBC (channel 702) in TitanTV, it will tune to channel 2704, which is WNBC.

Where can I find my recorded files?
The default directory for recorded files is:
C:\Users\Public\Videos
You can change the default directory by clicking on the settings icon in WinTV 7 (gear) then the capture tab. Here you will see the recoding directory you can click on browse and pick a new directory.
In Windows XP, files are recorded to:
C:\Documents and Settings\All Users\Shared Documents\My Videos\
Can I record TV shows with subtitles or closed caption?
If the program you are watching has subtitles when you record you will also get the subtitles as part of the recording. When playing back recorded files in Wintv 7 you can use settings menu to turn the subtitles on or off. ( recorded sub titles can only be seen when using the wintv v8 or v7 application for playback.)
Can I view and record my game play from external game sources with WinTV?
I am getting a black screen in WinTV, or I'm seeing choppy video images. What can cause this?
TV Signal strength:. If the TV signal strength is on the edge of being too low, you might see either a black screen where the live TV picture should be, or your live TV picture might be choppy. Also, be sure that the incoming signal from your video source is working properly.
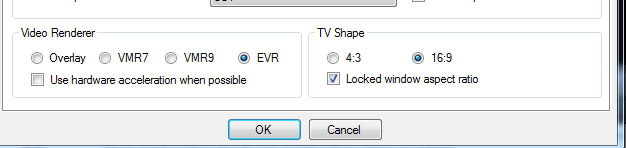
Graphic display adapter related: The video graphics acceleration mode can cause choppy live video or possibly cause a black screen where the live TV picture should be. To optimize the video graphics mode, in the WinTV v7 application go to Settings and look under Video Renderer. EVR is the default setting. Try VMR 7, VMR 9, or overlay for better results. You may also try placing a check mark in “Use hardware acceleration when possible”.
If there is still no improvement, enabling extended logging in WinTV and emailing the log files to tech support will help in troubleshooting the problem. (To obtain extended logs, first go to Settings/Advanced options. Enable extended logging, exit WinTV and reopen it for the change to take effect).
What video format will WinTV record in?
What software can I use to edit & burn the recorded files from WinTV?
When recording digital TV, all recordings are made in whatever format your digital TV is being transmitted in. For example, ATSC is transmitted as MPEG-2 and therefore WinTV recordings will be MPEG-2. The files will be .TS files.
When recording from analog video or analog TV, WinTV will record MPEG-2 video using a .TS format. To edit your videos, you can use any software editor that can work with .TS files or MPEG-2 files. Here are a few examples.
Ulead DVD MovieFactory
Womble MPEG-VCR
ArcSoft Total Media Extreme
VideoReDo TVSuite
What file size will the recorded videos be?
Digital Broadcasts (ATSC or QAM)
The file size of a digital signal capture depends on the bitrate of the digital signal. The bitrate is set by the broadcaster and cannot be user configured. Bitrates for digital signals can range anywhere from about 1.2 Mbits/sec up to 19.3 Mbits/sec. Most of the time these bitrates are variable and not constant. Capture sizes for ATSC & QAM recordings range from approximately 1.7 Gigabytes per hour up to 8.3 Gigabytes per hour.
Analog TV or analog video
The WinTV application converts analog signals to digital in order to record. There are four recording profiles. The following list shows recording file sizes for burning to 4.3Gb DVD:
Best - Approx 1 Hour+
Better - Approx 1 1/2 Hours
Good - Approx 2 Hours
Fair - Approx 3 Hours
How do I scan for FM radio channels? And once I have scanned for FM radio, how do I find these radio stations in WinTV v7?
On those WinTV products with FM radio, you can scan for FM radio channels by clicking the Setup button (gear button) and then clicking on the Device tab. Choose your WinTV product, and then click Tuner setup. Click Analog FM radio and then Scan.
Once you have scanned for and found FM radio stations, you can listen to FM radio in WinTV v7. To select a channel, Right Click on the live WinTV v7 window to bring up the Option menu, and then click Find channel. Your FM radio channels can be found at the bottom of the channel list.
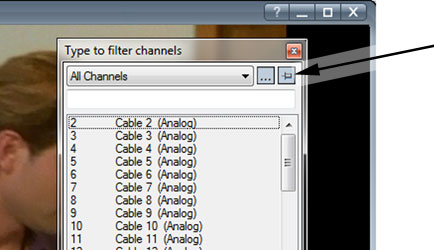
How can I see the WinTV v7 channel list all the time?
You can display the TV and FM radio channel list all the time by Right Clicking on the live WinTV v7 window to bring up the Options menu, and then clicking Find channel. You will see the Channel list (see picture below).
In the upper right hand corner of the Channel list is a small "pin" icon. Click this icon to "pin" your channel list to the WinTV v7 window.
Keyboard shortcuts
-
Ctrl A Aspect ratio
Ctrl D Display the video and audio format of the TV program
Ctrl F Freeze the video
Ctrl Z Open TV Scheduler
Ctrl O View program details (digital TV program, where provided in the broadcast)
Ctrl S Display subtitles
Ctrl W Full screen toggle
Alt F Open File menu for playback
Alt M Open the Task Menu
Alt P Previous channel
Ctrl Q Pause
Ctrl P Play
Alt R Record
Alt S Stop
Alt T Start TV
Ctrl C Catch up
Ctrl > Skip ahead
Ctrl < Skip back